
Next Steps - Transfer Courses and Eqv's
Important: This guide will be using data from FlightPath 5.x and the 5.x version of the Sample Data module, though it is very similar to the data entered during the Getting Started guide. As such, you may see screenshots which do not exactly match what you have, though it should be similar enough for this demonstration.
It is also assumed that you have worked through (or are at least familiar with) the Next Step - Student Courses & Substitutions guide. If you haven't done so already, please take a look at that guide first.
You should also take a look at this documentation page, which explains what each field relating to transfer courses is used for: http://getflightpath.com/node/862
If your school uses Banner, it is strongly recommended you use the Banner Integration module, which sets up most of this data for you in a nightly routine.
Transfer Courses
FlightPath currently has no way in the UI to modify students' transfer credits, so we will do this in a database editor (eg, phpMyAdmin, Navicat, etc)
To set up transfer credits for a student, 3 tables are used: transfer_institutions, transfer_courses, and student_transfer_courses.
Let's create some transfer credits for our test student. From the Sample Data module, my test student's CWID is 222222, but you should use whichever CWID your test student is assigned.
We will create the course "BUS 221" from "Peacock University", which the student took last semester and made an "A".
- Begin by opening the transfer_institutions table. We will first need to create our fictitious "Peacock University". Enter the following information to that table:

The "state" field isn't actually used at the moment, but it might be one day, so we will go ahead and make use of it.- We just made up the institution_id, but it is assumed at your school, you already have id's or codes for the institutions you accept credits from.
- Next, let's open up the transfer_courses table. This table should contain every possible transfer course which FlightPath needs to be aware of. This is where an automated nightly script (which reads from your student records database) is a necessity!
- Add the following data to the row:

- I am intentionally NOT entering anything for the transfer_course_id field. It is an autoincremented value, that will get filled in when you save this record. In my case, since this is the first transfer course, it is the number 1. This is the unique "transfer course id" which FlightPath will use to identify the course from here on out.
- Finally, let's say that our student took this course last semester, and that they made an A in it.
- Open the student_transfer_courses table and enter the following:

- Do not enter anything for the "id" field, it will autoincrement normally.
- Notice that I am intentionally changing the title in the "student_specific_course_title" field. This way, students can have titles just for them, when they took it. Leave blank if not needed.
- Okay, now that we have created the course, pull up our test student, and you should see the following:
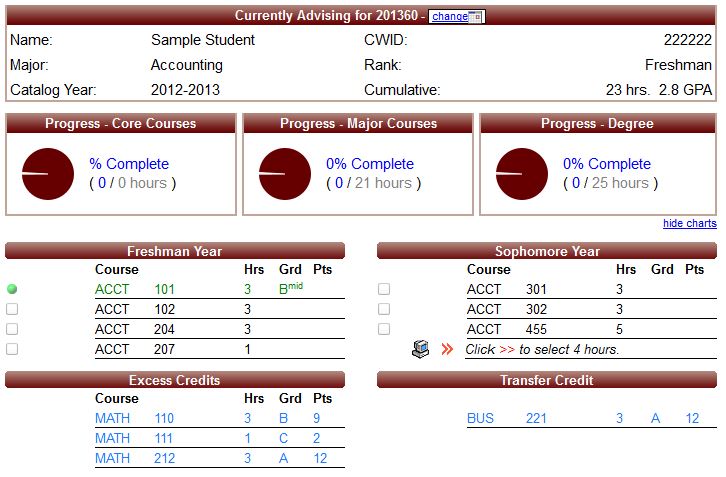
- Notice that our transfer credit now appears in its own block. If you want you can now substitute it for any requirement on the degree plan. If you click the course you will get some information about it.
Transfer Eqv's
Let's say that we know that BUS 221 is equivalent to our ACCT 204. Let's now set up FlightPath to automatically see that eqv, and assign it.
- Before we can begin, we need to know what FlightPath has assigned to your "local" course ACCT 204 (or whatever course you want to use). There is no way to know in this guide what the course_id will be, so I will show you how to find it out.
- Open your "courses" table, and look for ACCT 204 (or DEMO 204 if you are using the data from the Getting Started guide). You should see something like this:

- For me, the course_id (NOT the "id", which is a simple autoincrement value), is the number 8370715. This is a randomly assigned number, so yours WILL BE DIFFERENT! Make note of whatever your course_id is, then proceed to the next step.
- Open the transfer_eqv_per_student table, and enter the following data:

- Again, do not enter anything for "id", it is a simple autoincrement value.
- Also, remember to use your own "local_course_id" from your courses table.
- In case you are wondering what the broken_id is, you can leave it as zero for now. It is used for when a transfer eqv is broken into several pieces. You can set it to "1" (or any non-zero number) for every "piece" that is broken. Right now, FlightPath will simply ignore those eqv's. If you aren't sure what to do, just leave it as zero.
- Now, reload your test student, and you should see something like the following:
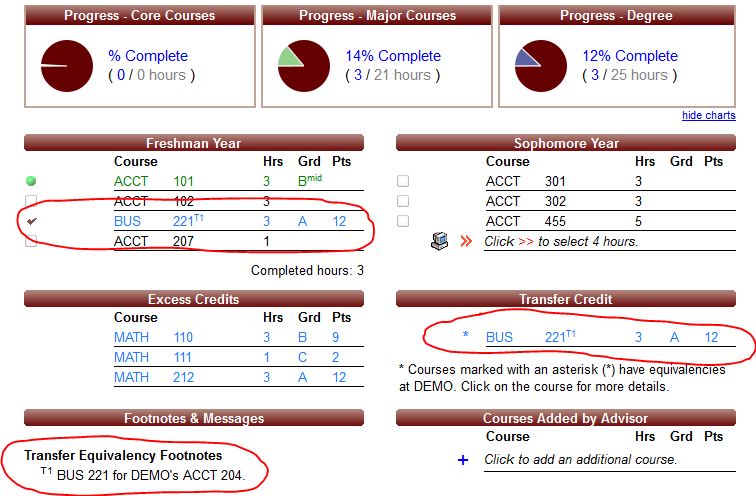
- Notice that now, the BUS automatically fills into the degree plan, with a "T1" superscript. We also now see a message at the bottom, describing the transfer eqv that has been established.
- If you click the BUS course, you will see additional equivalency information, and be given the opportunity to remove the eqv for this student.
- At this point, FlightPath will treat the BUS 221 course as a direct equivalent to our original course. It will fill into any groups, for example, which called for ACCT 204