
Getting Started Step Four: Degrees
So, now we have some courses created, as well as a group to experiment with.
We can now create a degree plan.
Visit the Admin Console page, scroll to the bottom, and click the "Degree Plans for [catalog year]" link.
The page that loads will display all of the degree plans available for the selected catalog year. If this is your first time setting up, then this page should be blank.
Let's get started by clicking the "Add a new degree plan..." link at the top of the page.
You should now see the following screen:
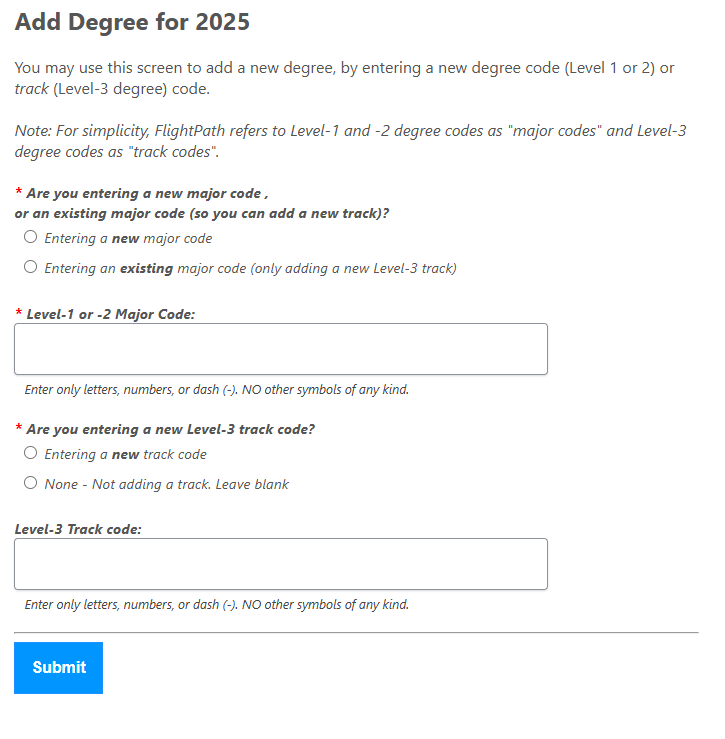
Let's take a moment to discuss Degree Plans in FlightPath.
FlightPath uses the concept of Level-1, 2, and 3 "degree plans".
- A Level-1 degree plan is something the student can graduate in. For example, a BA in English degree, or an Associate's in Biology degree.
- A Level-2 degree plan is almost always a "minor". It's a lesser degree plan which isn't tied to any other degree. So if a student is majoring in Biology, and getting a minor in Political Science, then Biology would be a level-1, and the Political Science minor would be entered as a Level-2 degree.
- A Level-3 degree plan is internally known as a "track". It can also be thought of as a concentration, emphasis, etc. It's a degree plan that doesn't exist on its own; only in conjunction with a Level-1 or Level-2 degree plan.
- For example, if you a majoring in Biology with an emphasis or concentration in Virology, then Virology would be a "Level-3" degree plan, AKA a Track. And, it would be "attached" to Biology. The student could not earn a degree in Virology by itself.
Regardless of the Level number, all degree plans must have a unique "major code." That's how we describe the code in FlightPath, even if it is not actually a "major".
Continuing our demonstration...
Select the "Entering a new major code" option. For the Major code, enter DEMO. For "Are you entering a new Level-3 track code?" select "None". Click the Submit button.
You will receive a message saying the degree was created. Return to the "Degrees List" and look for the "DEMO" degree you just created. It will appear as a link. Click it to load the degree for editing.
You should now see a screen which looks similar to this:
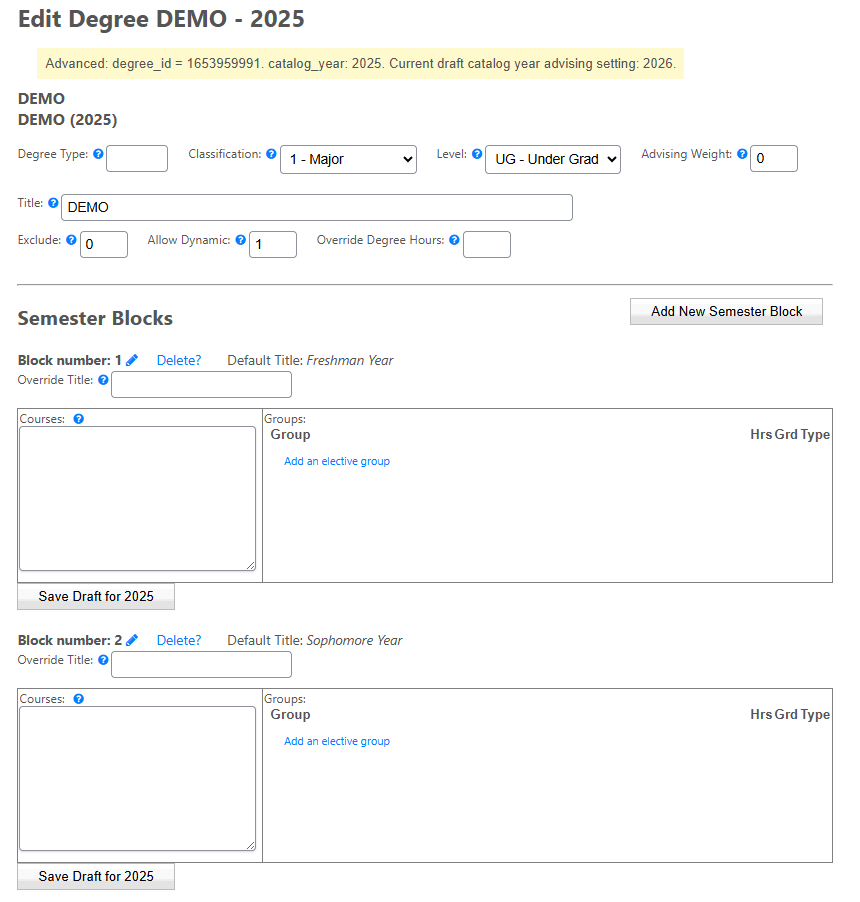
Let's go over the fields at the top of this screen.
- Degree Type
- Ex: BA, BS, PhD
- Classification
- This is where you specify the Degree Level. Your levels can be set up in the System Settings form.
- Level
- This refers to the student level that this degree is intended for. Ex: Undergrad or Graduate
- Advising Weight
- If this degree plan is every combined with another degree (eg, a minor, double major, concentration, etc), the Advising Weight value tells FlightPath (1) how to display this degree plan in lists, and (2) in what order to evaluate a student's degrees when assigning courses.
- Unlike the "Priority" setting for Groups, the Advising Weight assumes that lighter weights (eg, 0) "float to the top", and heavier weights (eg, 10, 20, 30) sink to the bottom.
- So if you want a degree plan to be handled normally, simply enter 0.
- If you want a degree plan to appear after other degree plans, give it a higher Advising Weight.
- Note: it is recommended that a degree's tracks (level-3 degrees) have the same advising weight as the main (level-1 or 2) degree.
- Exclude
- If you do not wish to delete a degree (because you may still have students majoring in it), but you do not want it to show in What If as an option, set Exclude to "1". Otherwise, leave as "0".
- Allow Dynamic
- Should this degree plan be allowed to combine with other degrees?
- In almost all cases, this should be set to 1 (the number one).
- Override Degree Hours
- FlightPath will automatically calculate the total number of hours a student must earn in order to complete a degree. However, if you need to manually override that calculation, you can enter that value here. In most cases, you can simply leave this blank.
- A note on Tracks (Level-3 degree plans)
- There will be a few extra fields at the top for tracks. Simply click the "?" icons for explanations of each field.
Semester Blocks
A degree plan is broken up into "Semester Blocks", representing semesters, years, terms, or any other category. We refer to them as "Semester Blocks" to maintain consistency.
Each Semester Block is given a default title (eg, Freshman Year, Sophomore Year, etc), but this can be overwritten in the "Override Title" box.
Within each block, we can specify courses to take, and/or elective groups.
See this example:
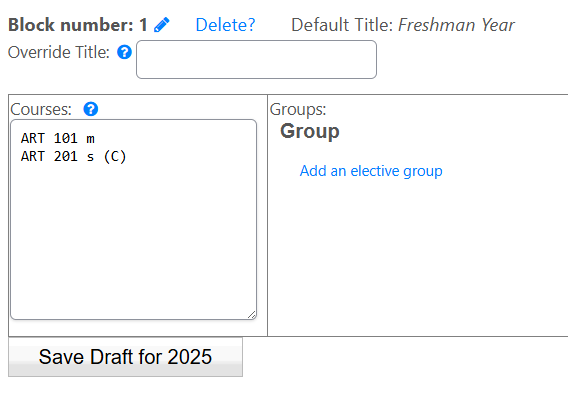
In the Courses box, we enter courses like so:
SUBJECT COURSENUM (notice the space between the subject and course number).
If we do not set the "requirement type", it will default to "m" for "Major Requirement". These are configured under Configure School Settings.
We can add a minimum grade requirement for the course by simply placing the grade in parenthesis. In the picture above, we can see the following:
ART 201 s (C)
This means that in order for ART 201 to fill into this degree plan, the student must earn a grade of C or better. Take note that there is a space between each element of the line. The "s" denotes this requirement type is "Supporting Requirement", as we have previously configured.
To continue our demonstration:
Enter the following information:
- Degree Type: BS
- Or whichever abbreviation is appropriate. BS is for "Bachelor of Science", but BA, AS, PhD, etc, will work. This field is simply for display purposes.
- Classification: 1 - Major
- Degree Title: Demonstration Degree
- Exclude: 0 (leave as zero)
We will now enter courses for Block 1. In this demo, we will consider Block 1 to be the student's requirements for the first year (Freshman year). Enter the following courses, one per line: DEMO 101, DEMO 102, DEMO 204, DEMO 207
Press one of the "Save for ..." buttons.
Now, let's scroll down to block 2. We are going to add 3 courses: DEMO 301, DEMO 302, DEMO 455.
Let's also add our elective group. Click the "Add an elective group" link, and a popup will open, asking us to select which group we wish to select. This list will contain every group in your system. Find your "upper_level_demo_electives" group we created in Step Two.
Your popup should look something like this (mine has extra groups than yours will):
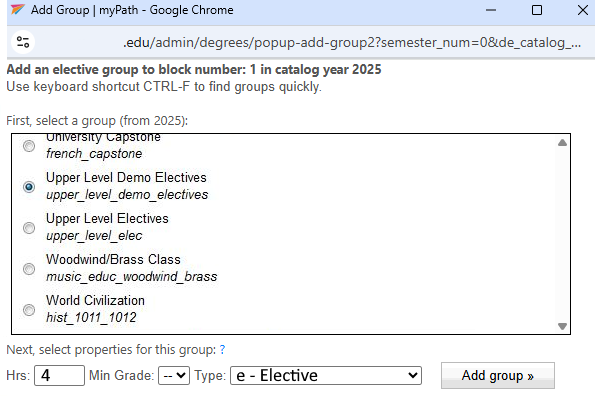
With the "Upper Level Demo Electives" group selected, enter "4" for the number of hours, and set Type to "e - Electives". Then click the Add group button.
Tip: Click the "?" link for more details about entering a group's requirements for that degree plan. For example, groups can require a range of hours. Ex: "3-6" means "3 to 6 hours required". This is a more advanced concept, and may not apply to every institution.
Now that we have successfully completed our degree, we can proceed to the next guide.