
Getting Started Step Two: Courses
Let's begin by creating some courses for us to work with. Log in as administrator, and scroll to the bottom of the Admin Console. You should see an area which looks like this:

Notice that all of our "Degree & Course Management" data is associated with a catalog year. In most places throughout FlightPath, catalog years will be saved with only the leading year. For example, for 2025-2026 will be saved and displayed to administrators as simply 2025.
- Begin by clicking the "Courses for [catalog year]" link.
- You should now see (at the top of the screen) several links. Click the Add a Course for [Year] link at the top to add a new course.
Your screen should now look something like this:
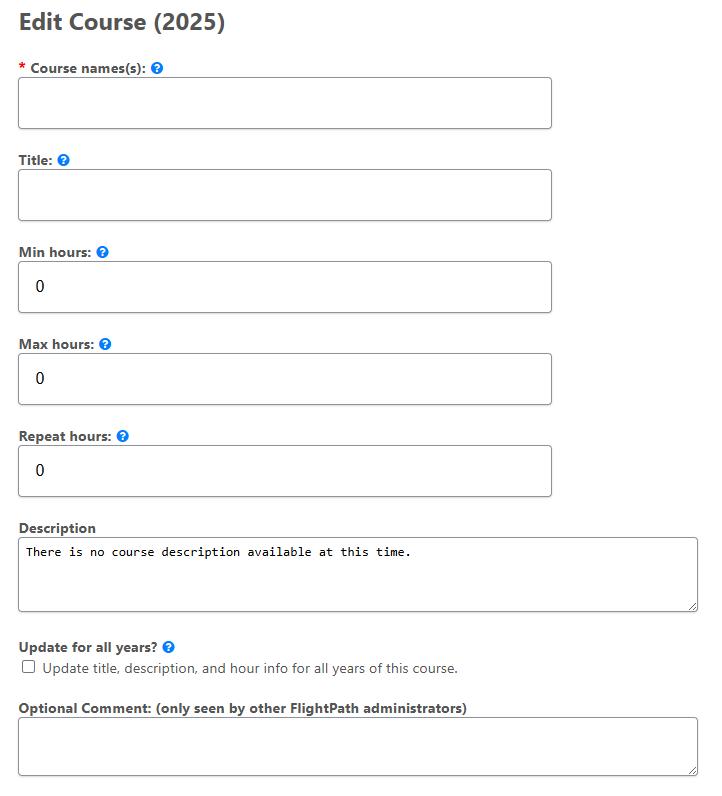
Let's go over what each field does:
- Course Name(s)
- This is the subject and course number of the course, separated by a space.
For example: ART 101 - Courses can have multiple names. Either because they are cross-listed, or if a course has changed names. You simply separate them with a comma.
For example: ART 101, ART 1001 - If you have an old name for a course which should not show up in FlightPath, but which a student may have taken, we include the word "exclude". We would do this especially if you have just changed the name of a course, but you want students who earned credit under the previous name to still have that course fill into their degree plans.
For example: ART 101 exclude, ART 1001- This means "ART 101 is the old name and don't display it in lists unless that's what the student took. Otherwise, use the name ART 1001".
- This is the subject and course number of the course, separated by a space.
- Title
- The title of the course. Ex: "Introduction to Art"
- Min hours / Max hours (aka "credits")
- For most courses, these two fields will be the same value. If a course is worth 3 hours, then both the Min and Max will be the same: 3.
- However, some courses can be variable-hour courses. This is especially common in Guided Study courses. For example, a course might be worth between 1 and 6 hours. This is where you would enter Min: 1, and Max: 6.
- Repeat hours
- Most courses cannot be repeated for credit. If a student repeats a course, your institution will usually take the policy of "permit the best grade" or "ignore the previous attempt". See the School Settings.
- However, if a course may be repeated for credit, this is how many hours it can be repeated for.
- Let's say MUSC 2002 is worth 2 hours, and can be repeated for credit up to 3 times You'd enter 2 for "Min" and "Max", and you'd enter 6 for "Repeat hours".
- It is also common for courses with variable hours to be allowed to repeat for the max number of hours.
- Ex: Course XYZ. 1 - 6hrs. May be repeated for up to 6 hrs.
- If the course is not meant to be repeated, either leave the Repeat hours set to zero, or set it to be the same value as the Min hours.
- Description
- The course description from your catalog.
- Update for all years?
- FlightPath is able to save different titles, descriptions, and hour information for a course on a per-catalog year basis.
- Checking this box (which is usually what you'd want to do) will update all available catalog years with this course's information.
- Optional comment
- This is a simple text box where you can leave notes for yourself or other FlightPath admins about the course. It will not be visible to students or regular faculty/staff/advisors, etc.
To follow along with setting up a test degree...
Enter the following data:
- Course Names: DEMO 101
- Title: (Optional): Demonstration Course 101
- Min hours, Max hours, Repeat hours: 3
- FlightPath allows us to have courses with variable hours, but for this demonstration, just make all these hours the same. FlightPath will treat this as a regular course with a set number of hours.
- Description: (Optional) : This is a demonstration course.
- Update for all years?: Leave unchecked
After entering this data, click the Save button at the bottom of the screen.
After you press Save, the screen will reload, telling you the course has been saved correctly. Click the "Back to Courses List" link at the top of the screen, then navigate to the "D" courses. You should see DEMO 101 in the list.
Now, repeat the steps for the following additional courses we wish to create:
DEMO 102 (3 hours), DEMO 204 (3 hours), DEMO 207 (1 hour), DEMO 301 (3 hours), DEMO 302 (3 hours), DEMO 345 (4 hours), DEMO 401 (4 hours), DEMO 455 (5 hours).
I know it's a lot of data to create, but when you are done we will have plenty of courses to experiment with.
Once you have created all of these courses, please proceed to the next guide.