
Getting Started Step Six: Creating Users, Roles, and Assigning Permissions
In a full production environment for FlightPath, you will probably have your users (students and advisors) created in a nightly routine from another database already set up at your school.
However, for the benefits of testing, FlightPath does have the ability to create users on the fly.
First-- a quick word about user permissions. For starters, students always have the lowest level of permissions in FlightPath. They may log in and view their advising history, but that is all.
Only Faculty users may be given more permissions.
Creating Roles
In FlightPath, Faculty users are assigned roles (for example, "Advisor", or "Instructor", or "Coordinator"), and then the role itself is assigned permissions in the system, like the permission to advise a student, the permission to search for students, etc.
Let's create a basic "advisor" role.
From the Admin Console, click the "User Roles" link. Type "Advisor" into the Add new role box, and click Add new. That's it!
Assigning Permissions
Let's give some permissions to our new Advisor role.
From the Admin Console, click the Permissions link.
The page that loads will display every permission in the system. You will notice that we have 3 roles at the top of the screen: Anonymous user (non-logged in), Authenticated user (anyone who has logged in, including students), and our new role, Advisor.
Make sure the "authenticated user" role has the "Access logged-in content" permission!
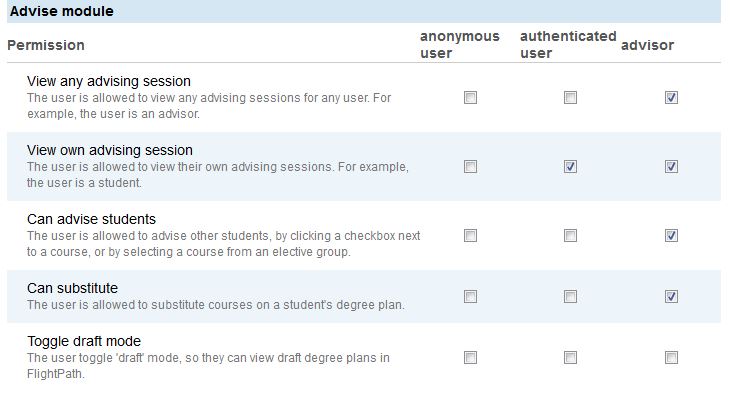
Scroll to the "Advise" module's permissions and check the following checkboxes for the authenticated and Advisor roles:
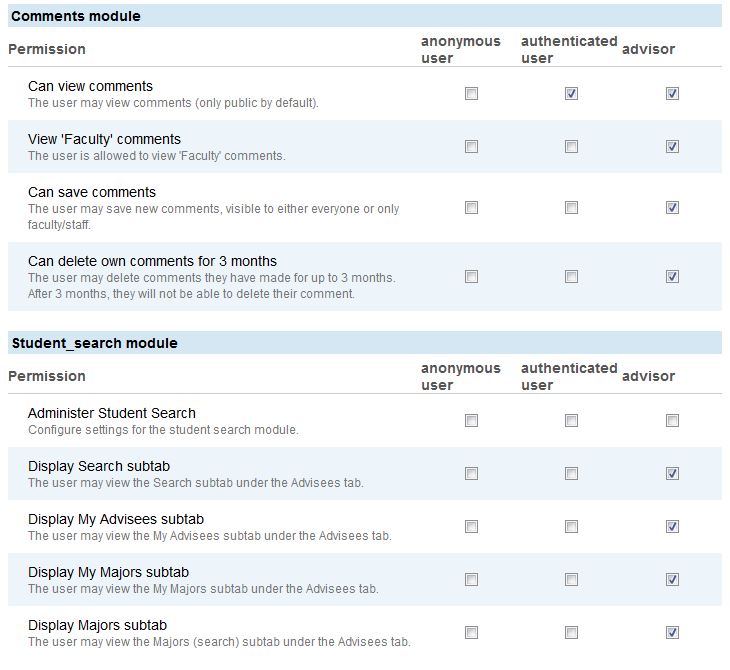
Then, scroll down to the Comments and student_search module permissions, and check the following boxes:
Feel free to scroll through and assign any other permissions as you see fit. Just be aware that some of the permissions are very powerful, so you wouldn't want them used by just anyone (and especially not students, or basic authenticated users).
Scroll to the bottom and click Save.
Adding Users (Students and Faculty) To FlightPath
Go back to the Admin Console and click the "Users" link.
On the page that loads, you can manage all of the users in the system. Our goal is to create 2 new users: 1 advisor (faculty) user, and 1 student user.
The forms for creating new users should be self-explanatory. Create a faculty member named "Test Advisor", and assign them the "advisor" role we created (option will appear after saving once). Feel free to enter any other details you wish.
For the student, first view the list of students by clicking the Student Users button at the top of the screen, then click the "Create new student user" link.
Create a student with the name "Test Student", and be sure to set their "Is active" to "1" (the number one), and their Major Code to "DEMO". Set their Catalog Year to "2012". Set their Rank to "FR".
Once you have saved your faculty and student user, you may proceed to the next guide.