
Getting Started Step Four: Degrees
So, now we have some courses created, as well as a group to play with.
We can now create a degree plan.
Visit the Admin Console page, scroll to the bottom, and click the "Degree Plans for ..." link.
The page that loads will display all of the degree plans available for the selected catalog year. If this is your first time setting up, then this page should be blank.
Let's get started by clicking the "Add a new degree plan..." link at the top of the page.
You should now see the following screen:
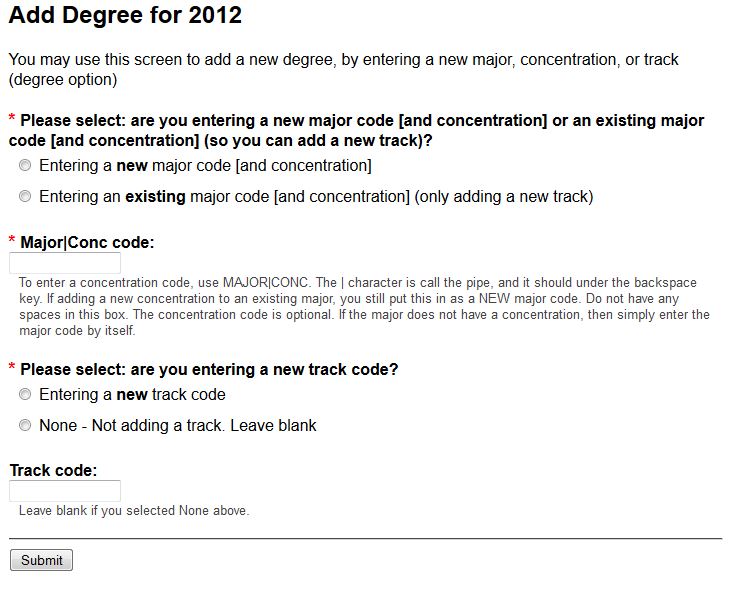
FlightPath allows for "concentrations" for a major, as well as "tracks". The difference is that a concentration is considered a distinct and different major, where as a track is presented to the student/advisor as an option for them to select. Internally, tracks are treated as a separate degree, just as a concentration is.
If you decide to use tracks or concentrations, before to experiement to decide which one is right for your situation. For our demonstration, we will not use either one.
On this screen, Select the "Entering a new major code" option. For the Major|Conc code, enter DEMO. For "Are you entering a new track code?" select "None". Click the Submit button.
You will receive a message saying the degree was created. Return to the "Degrees List" and look for the "DEMO" degree you just created. It will appear as a link. Click it to load the degree for editing.
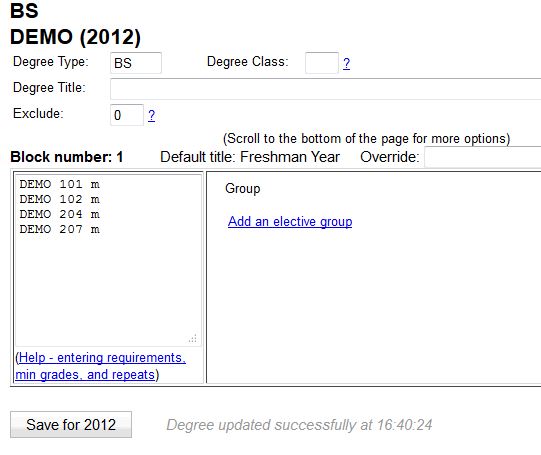
You should now see a screen which looks similar to this:
![]()
A degree plan is broken up into "Blocks", representing semesters or years or terms. Within each block, we can specify courses to take, and/or elective groups.
We will begin by filling out the information at the top, about the degree itself.
Enter the following information:
- Degree Type: BS
- Or whichever abbreviation is appropriate. BS is for "Bachelor of Science", but BA, AS, PhD, etc, will work. This field is simply for display purposes.
- Degree Class: (leave blank)
- Degree Title: Demonstration Degree
- Exclude: 0 (leave as zero)
We will now enter courses for Block 1. In this demo, we will consider Block 1 to be the student's requirements for the first year (Freshman year). Enter the following courses, one per line: DEMO 101, DEMO 102, DEMO 204, DEMO 207
Press one of the "Save for ..." buttons. When the page reloads, it should look like this:
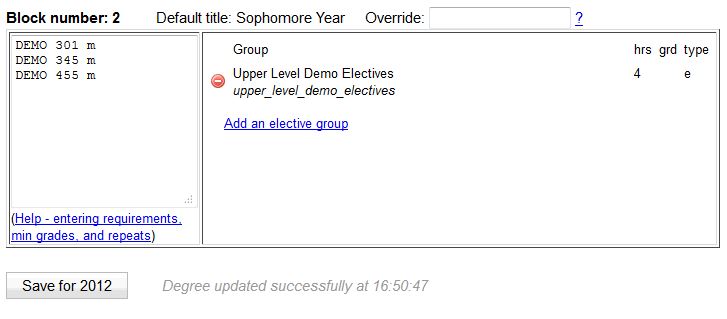
Hey-- what happened? The courses now have an "m" after them? That's right-- the "m" denotes that these courses are "major" requirements. Courses can be one of 4 types: Major, Supporting, Core, Elective, denoted by m, s, c, or e. You can also make up your own letter, for your own use later on. But by default FlightPath will recognize those 4 letters as codes, and the default it uses is "major".
Now, let's scroll down to block 2. We are going to add 3 courses: DEMO 301, DEMO 302, DEMO 455.
Let's also add our elective group. Click the "Add an elective group" link, and a popup will open, asking us to select which group we wish to select. This list will contain every group in your system. Find your "upper_level_demo_electives" group we created in Step Two.
Your popup should look something like this (mine has extra groups than yours will):
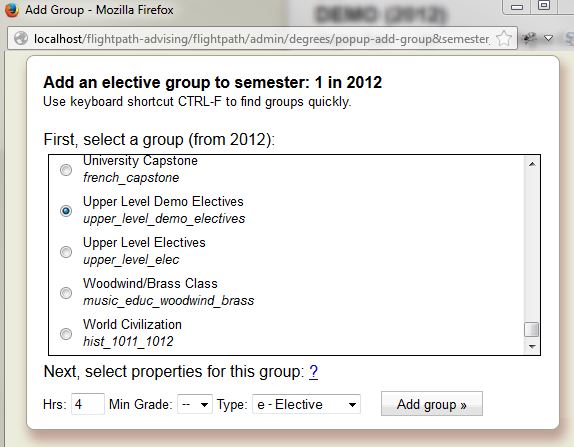
With the "Upper Level Demo Electives" group selected, enter "4" for the number of hours, and set Type to "e - Electives". Then click the Add group button.
When the page submits and reloads, Block 2 will now look like this:
Now that we have successfully completed our degree, we can proceed to the next guide.